Continuing on from the
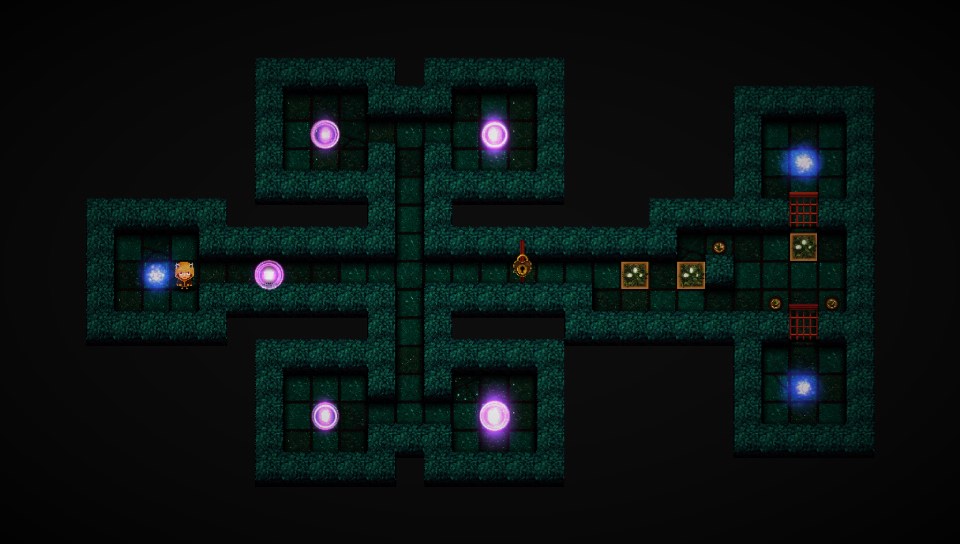
first installment, let's get on with the puzzle solving. The third portal room contains five puzzles and two exits.
Getting around: Collect the potions, stand on the trigger and send a clone past the open gate. Use the clone to half-step on the second trigger to keep the gate open, and move your original clone into the gate, shuffling them down. Use them to push the block above the lightning orb to get past, read the note and start pulling blocks around. Pull the original block to block the left side of the lightning bolt, so you can move further down the level. Move one clone to the bottom and pull that block over the water, sacrifice the clone to get the clock and escape.
Pull back: To open the gate, push the lower block right, push the block above you up, then move up that first block into the next chamber onto a trigger. move the second block along and then pull the remaining two into place using the minimum amount of pulls (four). In the orb room, use pull to move the block half a step left and send a clone over, it can safely get the clock and the original Violet can escape the room.
Isolation: Shoot the lower-left block to make some room and put the other three on the available corners. Pull one block out from the side to fill the last trigger and get out of the room to collect the other potions. Go back to the block room and move them using your pull power into a line in the water to collect the clock. Then pull the final block out to get to the portal. (easy isn't it, spent hours trying different tactics on this one!)
Beware the trap: Move the nearest three blocks around so you can push the right-hand one onto the trigger to zap a block. Now move the upper left block further left, the block below down, and move the middle block to the right so you can expose the portal. Collect the clock, and immediately move the block to your left to stop the ghost from coming down.
Pull over: Similar to Isolation, move the four blocks onto the triggers, but without using any pull powers. Just move the two left ones into the right room, and vice versa, with a bit of juggling. That leaves you with all the potion power to send two clones across the top row in the orb room, allowing one clone to collect the clock and you to escape.
Back in the portal room, collect the key, position the two nearest blocks on the lower triggers and then move the upper one to open the two gates. Take the upper portal first for a welcome change of colour.
Tempo: Walk left to right across the four triggers, stepping back after hitting the last one to avoid the blast. Go through the door, pick up the potion, and go across to pull the block into the water. Push the second block into the ghost room and position it so they can't follow you. Collect the clock and return to the portal.
Emergency button: Collect the potion, push the block in the main area up a few spaces, then a half-step right and down again onto the right-hand button. Go up to the higher room, move the left block (no. 1) up, so you can get above it. Then push it down and right, blocking the entrance to get the three blocks onto the triggers. Move the right hand block ( no. 2) down one, push the highest block (no. 3) left two spaces. Go down and around and push the no. 2 block back up and left. Push no. 2 onto the upper right trigger, go up and around to push no. 1 on the lower trigger, and up and around one more time to push no. 3 on to the remaining trigger.
Go back into the main room, move the original block down, push it up, pull it left and place it between the ghost and the trigger above it, then hit the clock. This will send him down the screen to trigger the door so Violet can get into the portal.
Curling: Collect the potions on the outer corners. Push the outer two blocks straight up. Then move the next two to the outer holes and send them up too. The clever bit here is stand half a step onto the ice and pull them back. Stand still, so they both block the lighting across the lower edge.
The second clever bit is to go up the middle path, face left and fire another pull at the block, then skate toward it so you stop under the clock, a few goes might be needed to get the timing right. Go down to get the clock, right to stop under the portal and up to enter it.
Third time is a charm: Move past the first block and take half steps to collect the two potions below it. Then push the block up to escape the lightning. In the second room, half push the block to the left, then push again and go right quickly to avoid the fireball. Push the block up and into the ghost room for later.
In the second lighting room, half push the upper left block down to block the lighting. Then fetch the spare block from the ghost room, pull it down the right-hand entry and half-cover the right hand lightning. move the middle block down and leave enough room to go around it without getting zapped and pull the last block down. Now cover the horizontal bottom lighting route with those two. Enter the green portal to go play Pac-Man.
Bonus: Hungry like a ghost: Zoom out the map so you can see the ghosts and collect all the dots. Break the map into quarters, and lure the ghosts into one, to clear the opposite area. Two power ups will chase them away, and when you get the last one the level finishes instantly, so don't worry about a chase for the last few.
To complete
Third time is a charm, do the same up to the third room. This time pull any three blocks into the ghost room, however you like, and place them as shown to block the ghosts in, so when you collect the clock, you can escape.
Having cleared the four main levels, you can now collect the key and go through the portal to the left. Here, the only thing to do is push a panel onto a trigger and return.
Go back through the portal, and then the portal you came in by. You can try the lower portal here, but will find there's nowhere to go. So, go back, and go left into the portal on the far left of the screen. Take the middle portal here and there's a new set of levels to solve, all accessible with a bit of curling.
Annoooooying: Go down, right, down and left to get the clock. Then go right, up, left, down, right, up to land on the trigger. You'll need to time this so the ghost either gets killed in the gate or trapped in the bottom half. Then go down, left up, right and down to enter the portal.
Sleep sliding away: Move across the purple squares, up, right, down, left, up to push the block onto the trigger that opens the gate. Now go down, down, right, up, left, up, right to pass the portal and onto non-slippery land. Get the clock and push the block down, carefully positioning it to trap the two ghosts out of harm's way so you can get to the portal.
Stacked: Collect the two potions and send a clone up the level. Move the original Violet down and right, then up to bring her into play. Move her left, up, right, down to put her on the same line as the clone.
Now play block tennis between the two to get one of them in the right place to grab the clock. When she grabs it, go left, down and right. With that done you can leave the level.
To enter the red portal and play the next mini-game to win the key, go as far as sending original Violet up the screen. Then use her to push the block down (or the clone) as the clone pushes it across screen. Now Violet can enter the red portal.
On the verge of exploding: This Bomberman clone isn't as scary as it looks. The basic rule is, plant a bomb, run away, plant the next bomb and you get two more. Keep blowing up the ghosts (some are slow and oblivious, a couple are faster and vaguely smart) and carefully make your way across the level to get rid of them all, to collect the key once they are dead. Just don't trap yourself and you should be fine, and use the zoom to make sure a ghost isn't sneaking around you.
Entropy: Collect the potions and put a clone on one trigger, while you stand on the other. Send clones up both sides and nudge the blocks until you can line the clones up at the top row. Have them meet so one can collect the clock. To get into the portal, have the clones do a cross over by the portal, so that one stops and can enter the portal.
Learning to ice: Collect the potion. Walk on the trigger and move down to block the green blast from hitting the target to keep the door open. Get the clock and read the note to uncover the Freeze skill. Freeze the ghost and push him into the water to make a bridge, to enter the portal.
Crossed: Left, down, right, up, right, down. Look up, create and activate clone, down, right, up, left, down.
Get the key and enter the room with two portals. Take the lower one first, push the block left then down to access the other section later, go back the way you came and enter the upper portal.
And here's
Part Three.